|
|
01/26/2011 |
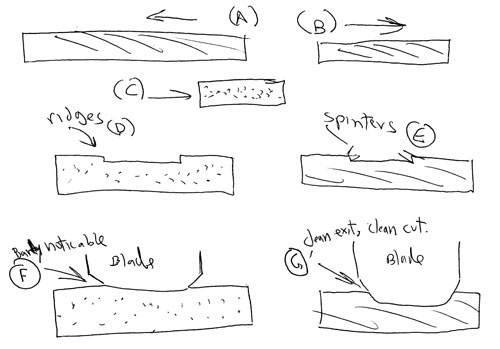
 You can plane with the grain (fig. A), against the grain (fig. B), or across the grain (fig. C). If you are planing the face of a board and going with the grain and the plane is set so that the corners of the plane iron are deeper than the surface of the wood you will leave small ridges (fig. D) which have to be removed at some point. If you plane against the grain you will get tear-out and a bad finish, although with a fine enough cut it might be ok. But still if the plane is set so the corners of the iron cut you will get ridges. You can plane with the grain (fig. A), against the grain (fig. B), or across the grain (fig. C). If you are planing the face of a board and going with the grain and the plane is set so that the corners of the plane iron are deeper than the surface of the wood you will leave small ridges (fig. D) which have to be removed at some point. If you plane against the grain you will get tear-out and a bad finish, although with a fine enough cut it might be ok. But still if the plane is set so the corners of the iron cut you will get ridges.
If you plane across the grain, the wood will not tear out, you can take a deep shaving but if the plane is set so the corners of the iron are below the surface of the wood (fig. E) the wood will splinter out at the sides and be harder and messier to plane.
The solution in all these cases is to camber, or curve, the iron. Camber is simply an old English word for curve. In order to get a smooth exit for the sides of the iron, so that you don't have ridges or splinters, you simply need to curve the iron slightly more than the thickest shaving you plan to make (plus more because in use the iron is tilted 45 degrees). For finishing where we are taking really fine shavings with the grain and just want to get rid of any hard ridges, the camber needs only to be the amount of a thin shaving (fig. F) - a couple of thousands of an inch or so. That's done by pressing on the sides of the plane iron when sharpening. For dressing lumber we typically mill the board by aggressively planing across the grain with a cambered iron. By going across the grain (fig. G) we don't have to worry about tearout, the shavings just peel off really easily and fast and we can take a very heavy shaving. So for a very heavy shaving we need to camber a minimum of 3/32" or 1/8". A 1/8" curve is too much to be done with a little honing, you have to grind the iron to a curve.

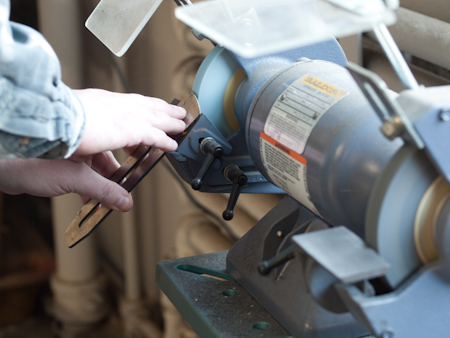
1 -Set your grinding rest square to the grinding wheel and grind the arc. You can draw the arc out on the iron or just eyeball it. Pivot the blade around an imaginary center line to grind evenly. It doesn't have to be a perfect circle. You can see if you are grinding evenly because when you look at the iron head on the remains of the straight bevel that you are grinding away will appear symmetric. Grinding with the iron at right angles to the wheel keeps you from overheating the iron.

2 - When you have established the curve set the grinding rest at the appropriate angle to reform a primary bevel at 25 or 30 degrees. With careful inspection, a light hand, dressed wheels, and quenching often you can easily grind the bevel to a wire edge. Just pay attention to the white line as you grind away so that you grind evenly. When the line disappears you are done. I typically redress my grinding wheels as I approach the end of the process so that I get the coolest running wheel on the thinnest edge, where I need it most. (For more information on grinding see my article in Fine Woodworking issue June 2008).
3 - With the bevel formed it's a simple matter to hone to final sharpness. Hone exactly as you would any tool but as you make your strokes pay attention to keeping the newly formed bevel flat on the stone (the bearing surface on the curved edge is small and unstable), and roll the blade side to side as you work so that you evenly hone the entire bevel. Any unevenness in the grinding needs to be worked out now. With a curved iron you will find using less pressure will make it easier to keep the bevel flat on the stone and turn it at the same time. When you have established smooth, grind mark free zone at the entire the cutting edge with the coarse honing switch to finer stones for the final edge as you would do when sharpening anything. The finer stones work easier. For more information on honing see: our guide to honing.
As it happened I hadn't done this operation in a few years and in the photos above I did an adequate but mediocre job. One area was ground a bit too much and I had to hone more than I would like. Also the curve was a little oval rather than elliptical. The iron sharpened up fine and it would have worked great. The whole process, including taking pictures took less than 20 minutes. However just before I went home I realized that I didn't camber the blade as much as I should have for a roughing operation so I went back the grinder, without the pressure of taking pictures, and reground and honed everything perfectly in about 10 minutes (maybe less).

I now have a sharp blade ready for wasting away wood as I dress the lumber. The iron happens to be D2 so the edge will last awhile. For carbon steel blades you might want to hone up a couple of irons so you don't have to stop to sharpen when you are working.
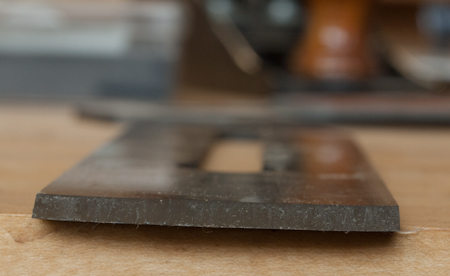
Note: The final picture is the iron ground to a wire edge but not honed.
|
Join the conversation |
|
 Joel's Blog
 Built-It Blog
 Video Roundup
 Classes & Events
 Work Magazine


 You can plane with the grain (fig. A), against the grain (fig. B), or across the grain (fig. C). If you are planing the face of a board and going with the grain and the plane is set so that the corners of the plane iron are deeper than the surface of the wood you will leave small ridges (fig. D) which have to be removed at some point. If you plane against the grain you will get tear-out and a bad finish, although with a fine enough cut it might be ok. But still if the plane is set so the corners of the iron cut you will get ridges.


It's not really missing; it's hidden behind the picture. I haven't scrutinized the page's HTML in any detail, but what's happening is that something about the way that Joel lays out the photos is incompatible with Internet Explorer; everything looks fine in Firefox or Google Chrome.
-Steve
It's just a myth that has no practical bearing on anything.